Stage 1: Setting Up the Server on Amazon
Important note: When completing this tutorial, I strongly recommend using a Mac and using a browser other than Safari. Safari tends to save files differently than Chrome or Firefox and as a result, your Key Pair File may not save properly. So, please use Chrome or Firefox. In the instructions, Instance = Server space.
1. Sign in to amazon web services. Create a free account if you need one at https://aws.amazon.com/.
2. Once logged in, under the COMPUTER subheader, click on EC2:

3. You will be taken to the EC2 Dashboard where you should see, “To start using Amazon EC2 you will want to launch a virtual server, known as an Amazon EC2 instance.” Click on the big blue button, Launch Instance.
4. (updated 4/18/2018) You will be brought to a page with dozens of server versions. The ones at the top are labeled Free Tier Eligible. To create DMI-TCAT, selectUbuntu Server 18.04 LTS (HVM), SSD Volume Type (Note: this will only give you about 1GB of storage space, so large archives, or multiple medium archives, will take up that space very quickly).

5. You will be brought to Step 2: Choose an Instance Type. Keep the default choice, which is Free Trier Eligible, and click Review and Launch.
![]()
6. You will be brought to Step 7: Review Instance Launch. To the middle right you will see a option to Edit Security Groups. Click it.
7. You will be brought to Step 6 (yes, we are going backwards it seems, but that’s okay), Configure Security Group. “A security group is a set of firewall rules that control the traffic for your instance. On this page, you can add rules to allow specific traffic to reach your instance. For example, if you want to set up a web server and allow Internet traffic to reach your instance, add rules that allow unrestricted access to the HTTP and HTTPS ports.”
You will need to create 4 security groups: SSH, HTTP, HTTPS, All ICMP. For each, start with the pull down menu for Type and apply the settings for Type, Protocol, Port Range, and Source. Then select Add Rule. Repeat 4 times, for each of the following:
- SSH: Type: SSH; Protocol: TCP; Port Range: 22; Source: Anywhere
- HTTP: Type: HTTP; Protocol: TCP; Port Range: 80; Source: Anywhere
- HTTPS: Type: HTTPS; Protocol: TCP; Port Range: 443; Source: Anywhere
- All ICMP: Type: All ICMP; Protocol: All; Port Range: 0-65535; Source: Anywhere (if you get an error message, paste 0.0.0.0/0 into the Source field)
They will eventually look like this:

Select Review and Launch. You may get a warning message. You can ignore it. Click Okay or Exit.
8. On the following screen, select Launch.
9. The Select an Existing Pair or Create a New Pair Window will pop up. Here you create a key pair file. “A key pair consists of a public key that AWS stores, and a private key file that you store. Together, they allow you to connect to your instance securely. For Linux AMIs, the private key file allows you to securely SSH into your instance.”
10. Choose Create a New Key Pair from the pull-down menu.
11. Name the Key Pair file. I recommend something meaningful and short, such as the one I’m creating for this tutorial: tutorialkey.pem.
12. Click Download Key Pair and save it to your computer, such as your Documents folder or anywhere else you’ll remember where it is located. You’ll need to type the folder path later, so best if isn’t buried within too many folders. You may also need to transfer it to another computer in the classroom, so please remember what you named it and where you saved it. NOTE: Do not try to open the downloaded .pem file because you will be an error message or a file that looks like a crazy jumble. Both the error and the crazy jumble are just fine.
13. Click Launch Instance. You will be brought to the Launch Status page. You will see a green box that says “Your instances are now launching.” Click the letter-number-combo just after the phradse, “The following instance launches have been initiated.”
![]()
14. You will be brought to your Instance Console, which contains information about the status of your instance. For now, look to see that your Instance is Running. Also, copy and paste into a separate document the Public DNS and the Public IP address.

Congratulations, you have set up your Amazon Virtual Server!
Stage 2: Acquiring Twitter Access Keys and Tokens
In order to set up DMI-TCAT, you will need Twitter API credentials. These credentials verify that you are a real person. I strongly suggest creating a new Twitter account just for your API credentials, though you can certainly use the one you just created for class.
1. Go to https://apps.twitter.com/ and log in with your Twitter account.
2. Click the button Create New App.
You will be asked to enter a Name, Description, and Website. The name and description can be very basic, such as:
- Name: My [add hashtag name] archive
- Description: An archive using DMI-TCAT
- The web site should be the URL of your web site
- Leave Callback URL blank.
3. Agree to the terms of service and click Create your Twitter Application.
4. You will be brought to a screen with information about the application you have created. The Keys and Access Tokens contains passwords you’ll need later on. Click on the Keys and Access Tokens tab.
5. You’ll see a header that reads, Token Actions. Click the Create Access Tokens button.
6. Copy and paste the following codes into another document so you have them later on:
- Consumer Key (API Key)
- Consumer Secret (API Secret)
- Access Token
- Access Token Secret
Congratulations, you have set up your Twitter Developer Access!
Stage 3: Installing DMI-TCAT
Installing DMI-TCAT requires using the Command Line to access your virtual server and install the necessary files. On a Mac, you can use the Terminal application. Completing these steps on a Windows computer is very complicated, so I recommend using a Mac. Once DMI-TCAT is installed, you will be able to access it from a browser on a Mac or PC.
The instructions below are a modified and more robust version of the ones provided on the DMI-TCAT installation guide.
To complete this stage, you will need the following:
- the .pem file you downloaded to your computer in Stage 1.
- the Public DNS address for the server your created in Stage 1; see the image at Stage 1, Number 14 for the Public DNS, which is circled.
- the Twitter Consumer Key (API Key), Consumer Secret (API Secret), Access Token, Access Token Secret you copied to a new document in Stage 2.Log
1. Log in to amazon web services at https://aws.amazon.com/. You created an account in Stage 1. To log in, click on Create an Account (yes, even though you have already created one). You can then log in to your account.
2. Once logged in, under the COMPUTE subheader, click on EC2:
3. You will be taken to the EC2 Dashboard where you should see a RESOURCES heading with the number of instances you have created. Click on the phrase “Running Instances”:

3. You will be brought to a page with a summary list of the instances you have. Click the checkbox next to the instance you want to see. When you do, important information will appear below.
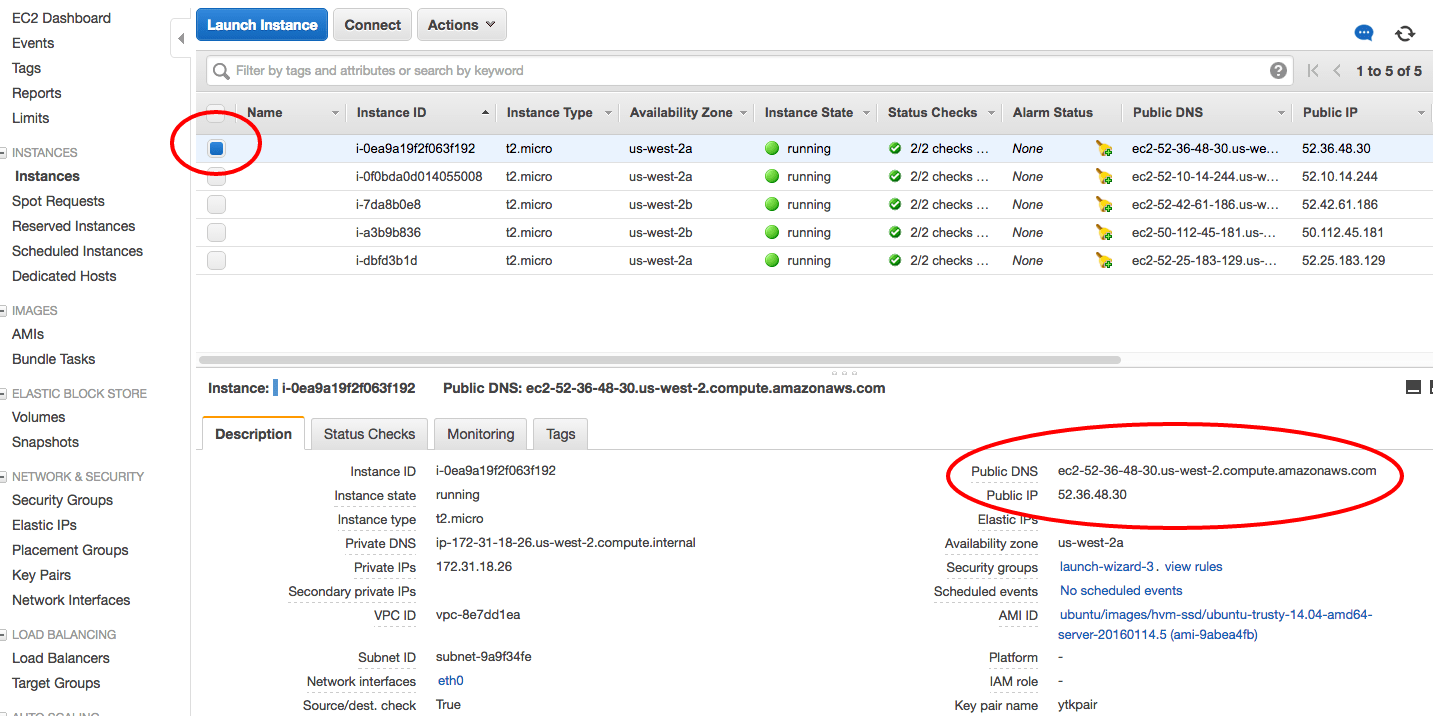
Note the PublicDNS and Public IP addresses. You will need those later, so do not close this window.
4. Open Terminal, which is in the Utilities folder in the Applications folder. To find it, press command+space bar and type Terminal in the search field.
5. Locate the .pem file on your computer and write down the file path. For example, if the file name is tutorialkey.pem and it is on my Desktop, I would write: ~/Desktop/tutorialkey.pem
6. Change the .pem file permissions. This will allow you to use the file to access the Amazon server you set up in Stage 1. In Terminal, type
chmod 400 ~/[pem file path].pem
For [pem file path] enter the file path of the .pem file you just wrote down in Step 5, above. For example,
chmod 400 ~/Documents/DMI-TCAT/tutorialkey.pem
Hit Return. If there are no errors, you will just be brought to a new line.
7. Connect to the server you set up in Stage 1. In Terminal, type and then press Enter (NOTE: replace the brackets and the instructions in the brackets with the actual lines, as shown in the examples):
ssh -i ~/[pem file path].pem ubuntu@[server Public DNS]
Use the .pem file path used in Step 6. For the server Public DNS, look to the Public DNS you noted Step 3. The line you enter should look like:
ssh -i ~/Documents/DMI-TCAT/tutorialkey.pem ubuntu@ec2-50-112-45-181.us-west-2.compute.amazonaws.com
The following will appear:
The authenticity of host 'ec2-50-112-45-181.us-west-2.compute.amazonaws.com (50.112.45.181)' can't be established.
ECDSA key fingerprint is SHA256:pvXCyJpuXpi64hatlYLJtUqmyLDlxZaiYjKRJuo/NK4.
Are you sure you want to continue connecting (yes/no)?
Write: yes
After a second or two, you will get a warning, then a welcome message with all sorts of info about the Ubuntu instance you’ve connected to. You will notice that your prompt has now changed to something like “ubuntu@ip-192-0-1-6:-$” which means you are now communicating directly with the server.
Congrats!! You’ve completed a huge step in the process!
8. We’re now going to check for Ubuntu upgrades. In Terminal, copy, paste, and then press Enter
sudo apt-get update
9. We’re now going to install Curl and check for upgrades. In Terminal, copy, paste, and then press Enter
sudo apt-get install curlEnter Y if prompted.
9a. When the processes are complete, in Terminal, copy, paste, and then press Enter
sudo apt-get update && sudo apt-get install php5-curlEnter Y if prompted. If you receive an error, proceed to step 10.
10. Download the install script (the -O, capital-o, option saves it to a local file with the same name as the remote file). In Terminal, copy, paste, and then press Enter
curl -O "https://raw.githubusercontent.com/digitalmethodsinitiative/dmi-tcat/master/helpers/tcat-install-linux.sh"
11. Make the DMI-TCAT installation file executable. In Terminal, copy, paste, and then press Enter
chmod a+x tcat-install-linux.sh12. Install DMI-TCAT. In Terminal, copy, paste, and then press Enter
sudo ./tcat-install-linux.shEnter Y when prompted.
13. While the process are going, you will be prompted to paste in or answer the following (bold text indicates the answer):
- Twitter API Consumer Key (generated when creating your Twitter app in Stage 2, Step 6, above);
- Twitter API Consumer Secret (generated when creating your Twitter app in Stage 2, Step 6, above);
- Twitter API User Token — now called Access Token (generated when creating your Twitter app in Stage 2, Step 6, above);
- Twitter API User Secret — now called Access Token Secret (generated when creating your Twitter app in Stage 2, Step 6, above);
- Mode of tweet capture to perform (phrases/keywords, follow users, or 1% sample);
- Whether to expand URLs in tweets or not (Yes);
- The name of the server (Public IP Address, which you noted in Step 3 — this is not the PublicDNS address you used in Step 7. Your IP address IS NOT the IP address between the [brackets] in the prompt);
- Whether to allow TCAT to automatically upgrade itself or not (Off);
- Other advanced parameters (but usually the default values for these can be used) (N).
The name of the server is very important. It will be the name of the machine in the URL used to access the TCAT Web pages. It must be the host name or IP address of the machine TCAT is being installed on.
The script will confirm the parameters before proceeding with the install. If the values are incorrect, answer “n” to edit the values. Answer “y” to start the installation process.
The summary will look like:
Install DMI TCAT with these parameters:
  Twitter consumer key: W9475BKiMsajFqdanl94AzxUn
  Twitter consumer secret: rrMDKb5IZ2Z0p6eKYA5b1UGfVQ4I1fLZRiNSxC5vHLI1ezae2o
  Twitter user token: 497330417-A8TZy4mUlflHj1d0ofGA0efdg2cvKYFmo7sbMpmN
  Twitter user secret: B1ANmOGrflAYOAV5iGqCyJpogZREjiIWvEJoRDgAEJ22D
  Tweet capture mode: track phrases and keywords
  Expands URLs in tweets: y
  Server: 50.112.45.181 (TCAT will be at http://50.112.45.181/)
  Automatically update TCAT: (not enabled)
  Advanced parameters:
    Shell user: tcat
    Shell group: tcat
    MySQL TCAT database account: tcatdbuser
    MySQL memory profile auto-configure: y
    TCAT admin login name: admin
    TCAT standard login name: tcat

Use these values (or "q" to quit) [y/n]?
If all the parameters are correct, enter Y.
14. It will take a up to 5 minutes to install. There will be times when the code stream pauses for up to 30 seconds. Don’t press anything. Just be patient.
When the install is complete, you will get the following message
Done: TCAT installed

Please visit this TCAT installation at these URLs:
 http://50.112.45.181/capture/
 http://50.112.45.181/analysis/

TCAT administrator login (for capture setup and analysis):
 Username: admin
 Password: S3Ypdt3JLXZjk2327FNCzAuB8HEyH624QQj2o

TCAT standard login (for analysis only):
 Username: tcat
 Password: NEyM3ptQxLmmtjSytTo5Y2bkvqah78AdFd7hHEuEw

IMPORTANT: please save the above generated TCAT Web login passwords.
 MySQL accounts have been saved to /etc/mysql/conf.d/tcat-*.cnf.
15. DMI-TCAT has two sides, the CAPTURE side, where you set up which tweets to archive and the Analysis side, where you start your analysis work and export the tweets. In the above message you have 4 important pieces of information:
- The CAPTURE URL
- The ANALYSIS URL
- The CAPTURE username and password
- The ANALYSIS username and password
Copy and paste that information in a separate document because you won’t be able to access it again later.
16. Go to the CAPTURE URL, enter the username and password to verify that your install worked. Make sure you log in upon first visit or you will get an error message upon later attempts. It may take a few minutes for the first tweets to appear in the archive.
17. Go to the ANALYSIS URL, enter the username and password to verify that your install worked. Make sure you log in upon first visit or you will get an error message upon later attempts.
Congratulations, you have successfully installed DMI-TCAT!
Phase 4: Getting started with DMI-TCAT
Here’s a nice overview of the Analysis module
And a tutorial for moving from DMI-TCAT to Gephi, focusing on Twitter mention networks